My first Ethereum Mining Rig
Intro
I have always been interested in cryptocurrencies, but like many of my friends never fully had a grasp of the how the market worked and how currencies were generated. After speaking with a colleague who has left his day job to day trade on Poloniex he explained the market and economic implications of cryptocurrencies. It peaked my interest and after a few days of research decided to embarked on building my very own ethereum mining rig. Below is the result of what my research yielded and what I ended up using for the machine and all the necessary components. My first rig yielded ~42MH/s with 4 RX460’s. This guide is meant for a total new comer like myself. Hope is helpful!
The Rig:
When building a machine the build list is pretty straight forward, if you have built a gaming machine in the past. ETH mining happens on the GPUs which will eventually determine your hash rate (X MH/s), which equates to how much ETHER (currency) you are generating from mining. For a more detail explanation of hash rate and what it is visit this link. Below is the part list I ended up purchasing:
These are the most basic components which really won’t change the performance of your miner non-critical.
- CPU — any slow processor would do, you will be running low overhead *nix OS, least likely Windows, just make sure it works with your motherboard.
- Memory — as long as it has minimally 4GB of RAM memory
- HDD/SDD — Any would work, although I highly recommend purchasing the pre-loaded SSD with ethos from gpushack.
Now the critical components:
- Motherboard — The most important aspect of purchasing a motherboard is making sure it has +4 PCI 2.0 slots, the more slots supported by the motherboard the more GPU density you can have and thus a bigger hash rate. Highly recommend reading through the most recommended boards (a bit aged still worth reviewing).
- Power Supply — Its what will feed your rig, two things are important when selecting the power supply, make sure you have plenty of capacity and it is very efficient. The lowest capacity I would recommend is 850 WATT. My go to choice is the corsair RM1000 which comfortably supports a 6 GPU machine very low power waste, does not heat easily and extremely silent. Another worthy mention is the EVGAs which are a tad cheaper as well.
- GPU — The most critical component in an ethereum mining rig by far. Base on crypto compare the best GPU to use today base on the consumption/vs hash rate generated is the AMD RX480. For ETHER mining it is recommended for the GPU to have +4GB of memory. Cryptocompare.com has a great list of suggested GPUs and reviews. Due to their incredibly high demand from miners and gamers it is darn near impossible to find RX480, RX470s, or their predecessors RX570 or RX580s in the market at a reasonble price. After much research and hunting for a deal I decided to settle with RX460’s (~11MH/s) for my first machine. These do not have as much power as the RX480 (~24 MH/s) but they also consume considerably less power. Most importantly they were 4–5 times cheaper than the RX480 sold today and easier to find.
Besides the core components there are a list of accessories I recommend to buy, although optional they will make your rig much easier to administer and manage.
- USB Riser Cards — you will need these to comfortably connect all GPUs.
- Power Meter (optional) — you will need this to understand what your power consumption is, see the economics portion of the guide for details.
- Power switch for ATX MOBO — if you don’t plan on shorting the two power pins on the motherboard buy this :-).
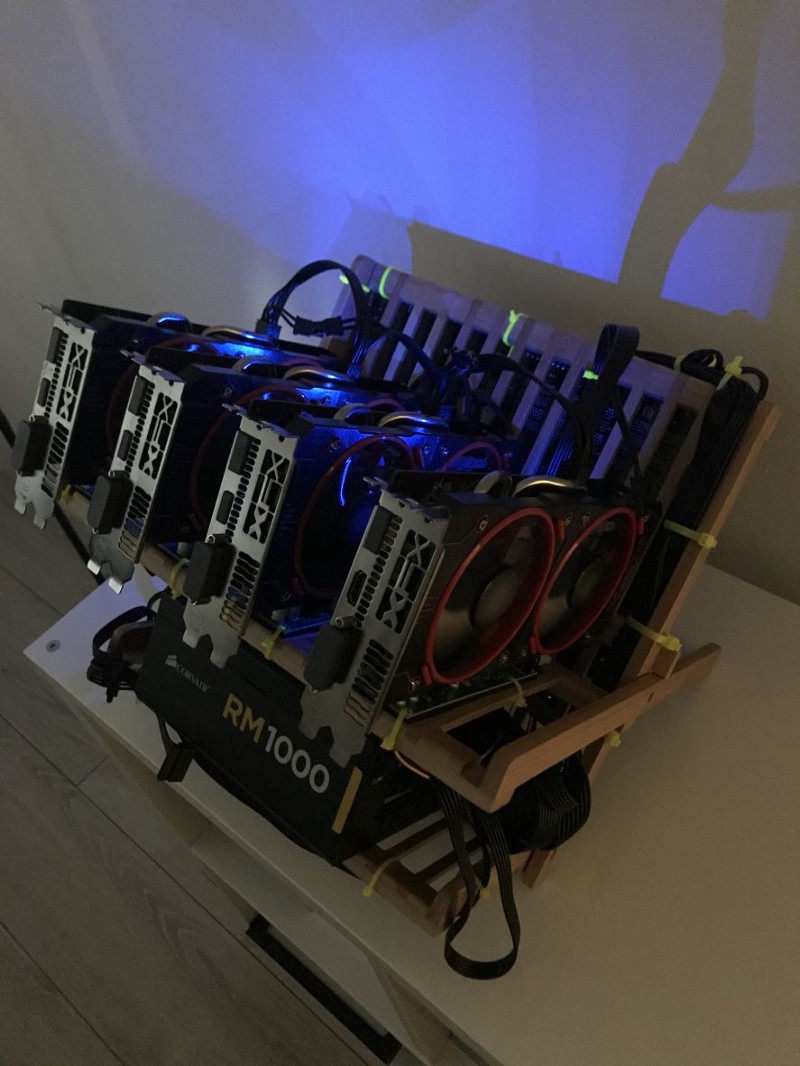
- Case — open air cases are recommended to allow a rig to breathe, most open air frame cases are $100 — $250 USD. Personally I decided to use a bamboo dish rack which has exactly the same effect and it costs $15 USD on Amazon. It does not look half bad either and is extremly portable.
Slide show of Build
Bundles
Gpushack.com has great bundles which include the motherboard, memory, cpu and an ssd with ethos pre-loaded. I high recommend these bundles as for one they are ultimately cheaper than buying the parts separately, but also gpushack are the guys who maintain ethos and everything will work out of the box with it. To find the bundles visit: https://gpushack.com/
ETHOS Distro
After some research the operating system I decided to use for my mining rig was http://ethosdistro.com/. ETHOS is an Ubuntu 16.04 base operating system with LXE as its desktop environment. Comes pre-built with amd and nvidia drivers, plus a ton of goodies like, an admin panel, over clocking utilities, statistics services, support for multiple miners and much more. The key to configuring ETHOS is if your rig make sure you comment out remote.local and make all your changes in local.conf as explained here: http://ethosdistro.com/kb/#quick-start-guide. Once booted ethos will automatically start mining to a pre-configured wallet.
a few interesting key commands are:
- show stats — displays your GPUs and system stats like temperature, clock rate, and model.
- show miner — displays the current miners worked being performed, a real time checker of how many MH/s your generating
This is an example of my current local.conf config as help. Remember edit the wallet settings.
Once ETHOS is up and running it will automatically generate an URL with an panel to monitor your instance from here is an example of my current rig:

Claymore Miner
Claymore is one of many miners that come pre-installed with ETHOS. Claymore not only is a very efficient miner whom boasts a 1–3% has rate increate over others but it can also dual mine multiple coins miner a loss of performance. The miner in ETHOS is set under the local.conf under the miner conf paramter.
A few important things to know regarding claymore and dual mining. There is a fee for using claymore as described by the developer/s:
This miner is free-to-use, however, current developer fee is 1% for Ethereum-only mining mode (-mode 1) and 2% for dual mining mode (-mode 0), every hour the miner mines for 36 or 72 seconds for developer.
Decred/Siacoin/Lbry/Pascal is mined without developer fee.
If you don’t agree with the dev fee — don’t use this miner, or use “-nofee” option.
Attempts to cheat and remove dev fee will cause a bit slower mining speed (same as “-nofee 1”) though miner will show same hashrate.
Miner cannot just stop if cheat is detected because creators of cheats would know that the cheat does not work and they would find new tricks. If miner does not show any errors or slowdowns, they are happy.
Also in my testing mining 2 coins potential ETH hash rate drops from 12 MH/s per RX 460 to 10, clearly reducing your gains. The alternative coins are Sia/Pascal/Decre, whom today have smaller markets than that of ETH and in my personal opinion not worth it as it also tacks on a 2% fee from the miner. Hence I configured Claymore to only mine ether. Passing the -dpsw parameter with your email will allow you to modify the payment schedule on nanopool, which is important if you want to get paid faster.
Here is a example of my claymore.stub.conf file where all the Claymore parameters live in ETHOS. Please remember to reboot the rig once configured in order for the settings to take place, do this by typing r on the terminal.
Mining Pools
ETHOS comes pre-configured with https://nanopool.org/ as the mining pool. If you are not sure what a mining pool is you can find a way better explanation than I can write here:
but in short, helps you get paid faster and track your progress for a fee, in nanopool’s case is 1%. Once your wallet address is configured you can track the mining progress to that wallet by visiting nanopool and passing your wallet address, you can see an example of one of my miners at:

Economics of Mining
There are 3 main variables when mining any crypto currency those are:
- current price of coin
- cost of power to mine
- Hash rate
The price of the coin will be primarily dictated by the market, a great place to keep a pulse of where it is with respect to there coins is https://coinmarketcap.com
The cost of power can be calculated simply by providing the power meter (suggested above) with what your local KwH cost is. This can be found in your electrical bill or in your local power utility website. For example in Miami it is $0.123. The meter will then count how much power per KwH your machine is consuming. My 4 GPU rig clocked in at about 430 WATTs.
Your current hash rate will determine how much ether you are actually mining. Hash rate can be affected by how power your GPU is, how difficult the hash calculation rate is at the moment. Again many of these can be found in crypto compare for each GPU.
Wallets and Trading Services
After having built a rig a few obvious questions will come up, what wallet should I use,how do I convert ETH to USD or any other coin?
There are many wallets out there, each with their pros and cons. After spending some time reading, the most recommended ETH wallet seemed to be mist, although I had a tough time getting it running on my linux desktop, and hence decided to experiment with alternatives. First I started with Jaxx as they had a mobile client as well as a local one. Jaxx is a great wallet, and the integration with shapeshift is really nice addition, but they strongly advice against mining payouts which made me shy away from them. Ultimately I settled on Exodus, mainly due to its user interface which I fell in love with, plus there are some added security benefits. A good comparison can be found at:
https://www.reddit.com/r/Bitcoin/comments/60a9si/jaxx_vs_exodus_which_is_a_better_wallet/
Both Jaxx and Exodus allow you to exchange between coins but they are not exchange markets themselves. If you are getting comfortable with mining and have an appetite/interest on day trading I high recommend Poloniex or Bittrex. Poloniex also advice’s users not o use them as a mining payout wallet.
Finally if you want to convert ETH or BTC to USD coinbase.com is the best place to do so. Another wallet provider that advice against using them as a mining pool payout. The main reasons are:
Final Words
My first rig has been running for about 4 weeks now and successfully making payments. This is a great (and potentially) profitable project to embark upon for any enthusiast out there. I am now on the path of building my second rig with 6 GPUs with new lessons learned (potential part 2 coming). Please drop me a line if this write up helped you (@divious_1) or you have any questions. Also credits to blockoperations.com who’s blog gave me direction throughout the build process.